> ## Documentation Index
> Fetch the complete documentation index at: https://docs.facebetter.net/llms.txt
> Use this file to discover all available pages before exploring further.
# 实现美颜
> 实现macOS美颜
## 添加 SDK 依赖
### 方法 A:CocoaPods 集成(推荐)
在项目的 `Podfile` 中添加 `Facebetter` 依赖:
```ruby theme={null}
target 'YourTargetName' do
# 请替换为最新版本号
pod 'Facebetter', '1.2.2'
end
```
执行安装命令:
```bash theme={null}
pod install
```
**Xcode 15+ 编译错误处理**
如果你使用的是 **Xcode 15** 或更高版本,可能会在编译时遇到 `Sandbox: rsync.samba deny(1)` 错误。这是由于 Xcode 默认开启了 **User Script Sandboxing** 导致的。
**解决方法:**
1. 在 Xcode 中选择您的 **Project**。
2. 进入 **Build Settings** 选项卡。
3. 搜索 `ENABLE_USER_SCRIPT_SANDBOXING`。
4. 将该选项的值从 `Yes` 修改为 **`No`**。
### 方法 B:手动集成 Framework
前往 [下载](https://facebetter.net/zh/download) 页面,获取最新版的 SDK,然后解压。
将 SDK 包内 `Facebetter.framework` 库,拷贝到你的项目路径下。
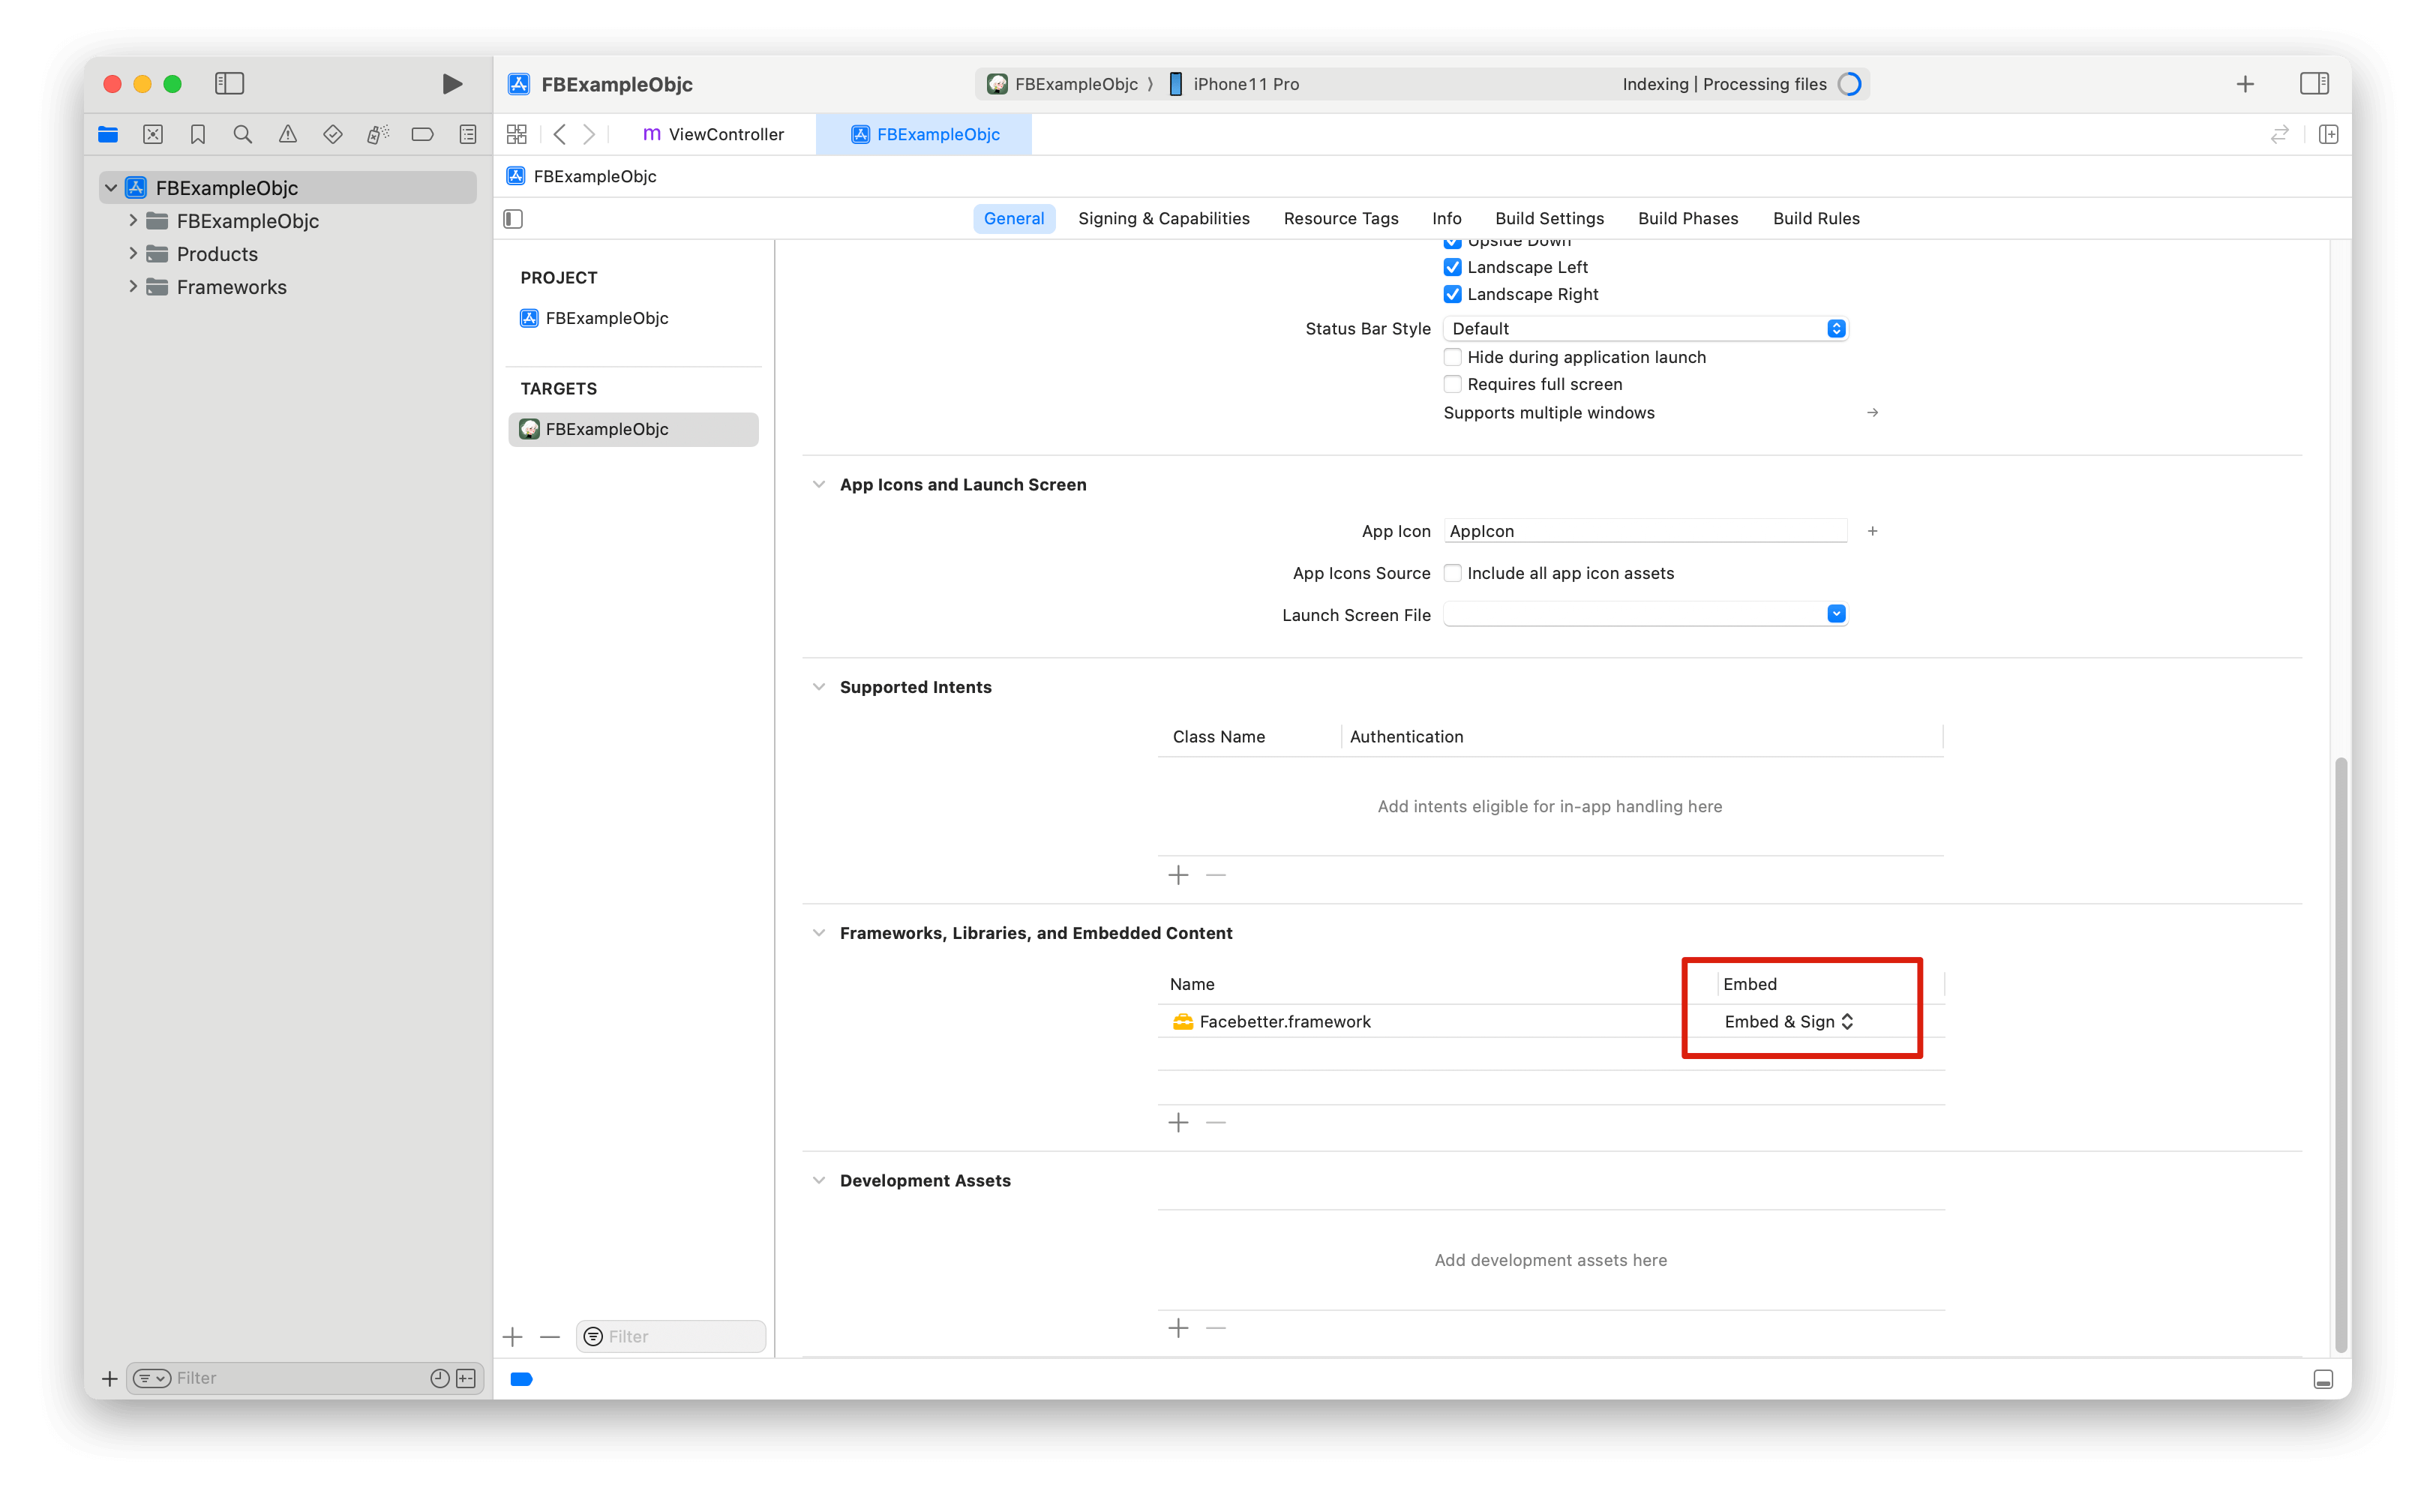
打开 Xcode,[参考](https://help.apple.com/xcode/mac/current/#/dev51a648b07)这里添加 `Facebetter.framework` 动态库,确保添加的动态库 **Embed** 属性设置为 **Embed & Sign**。
 ### 权限配置
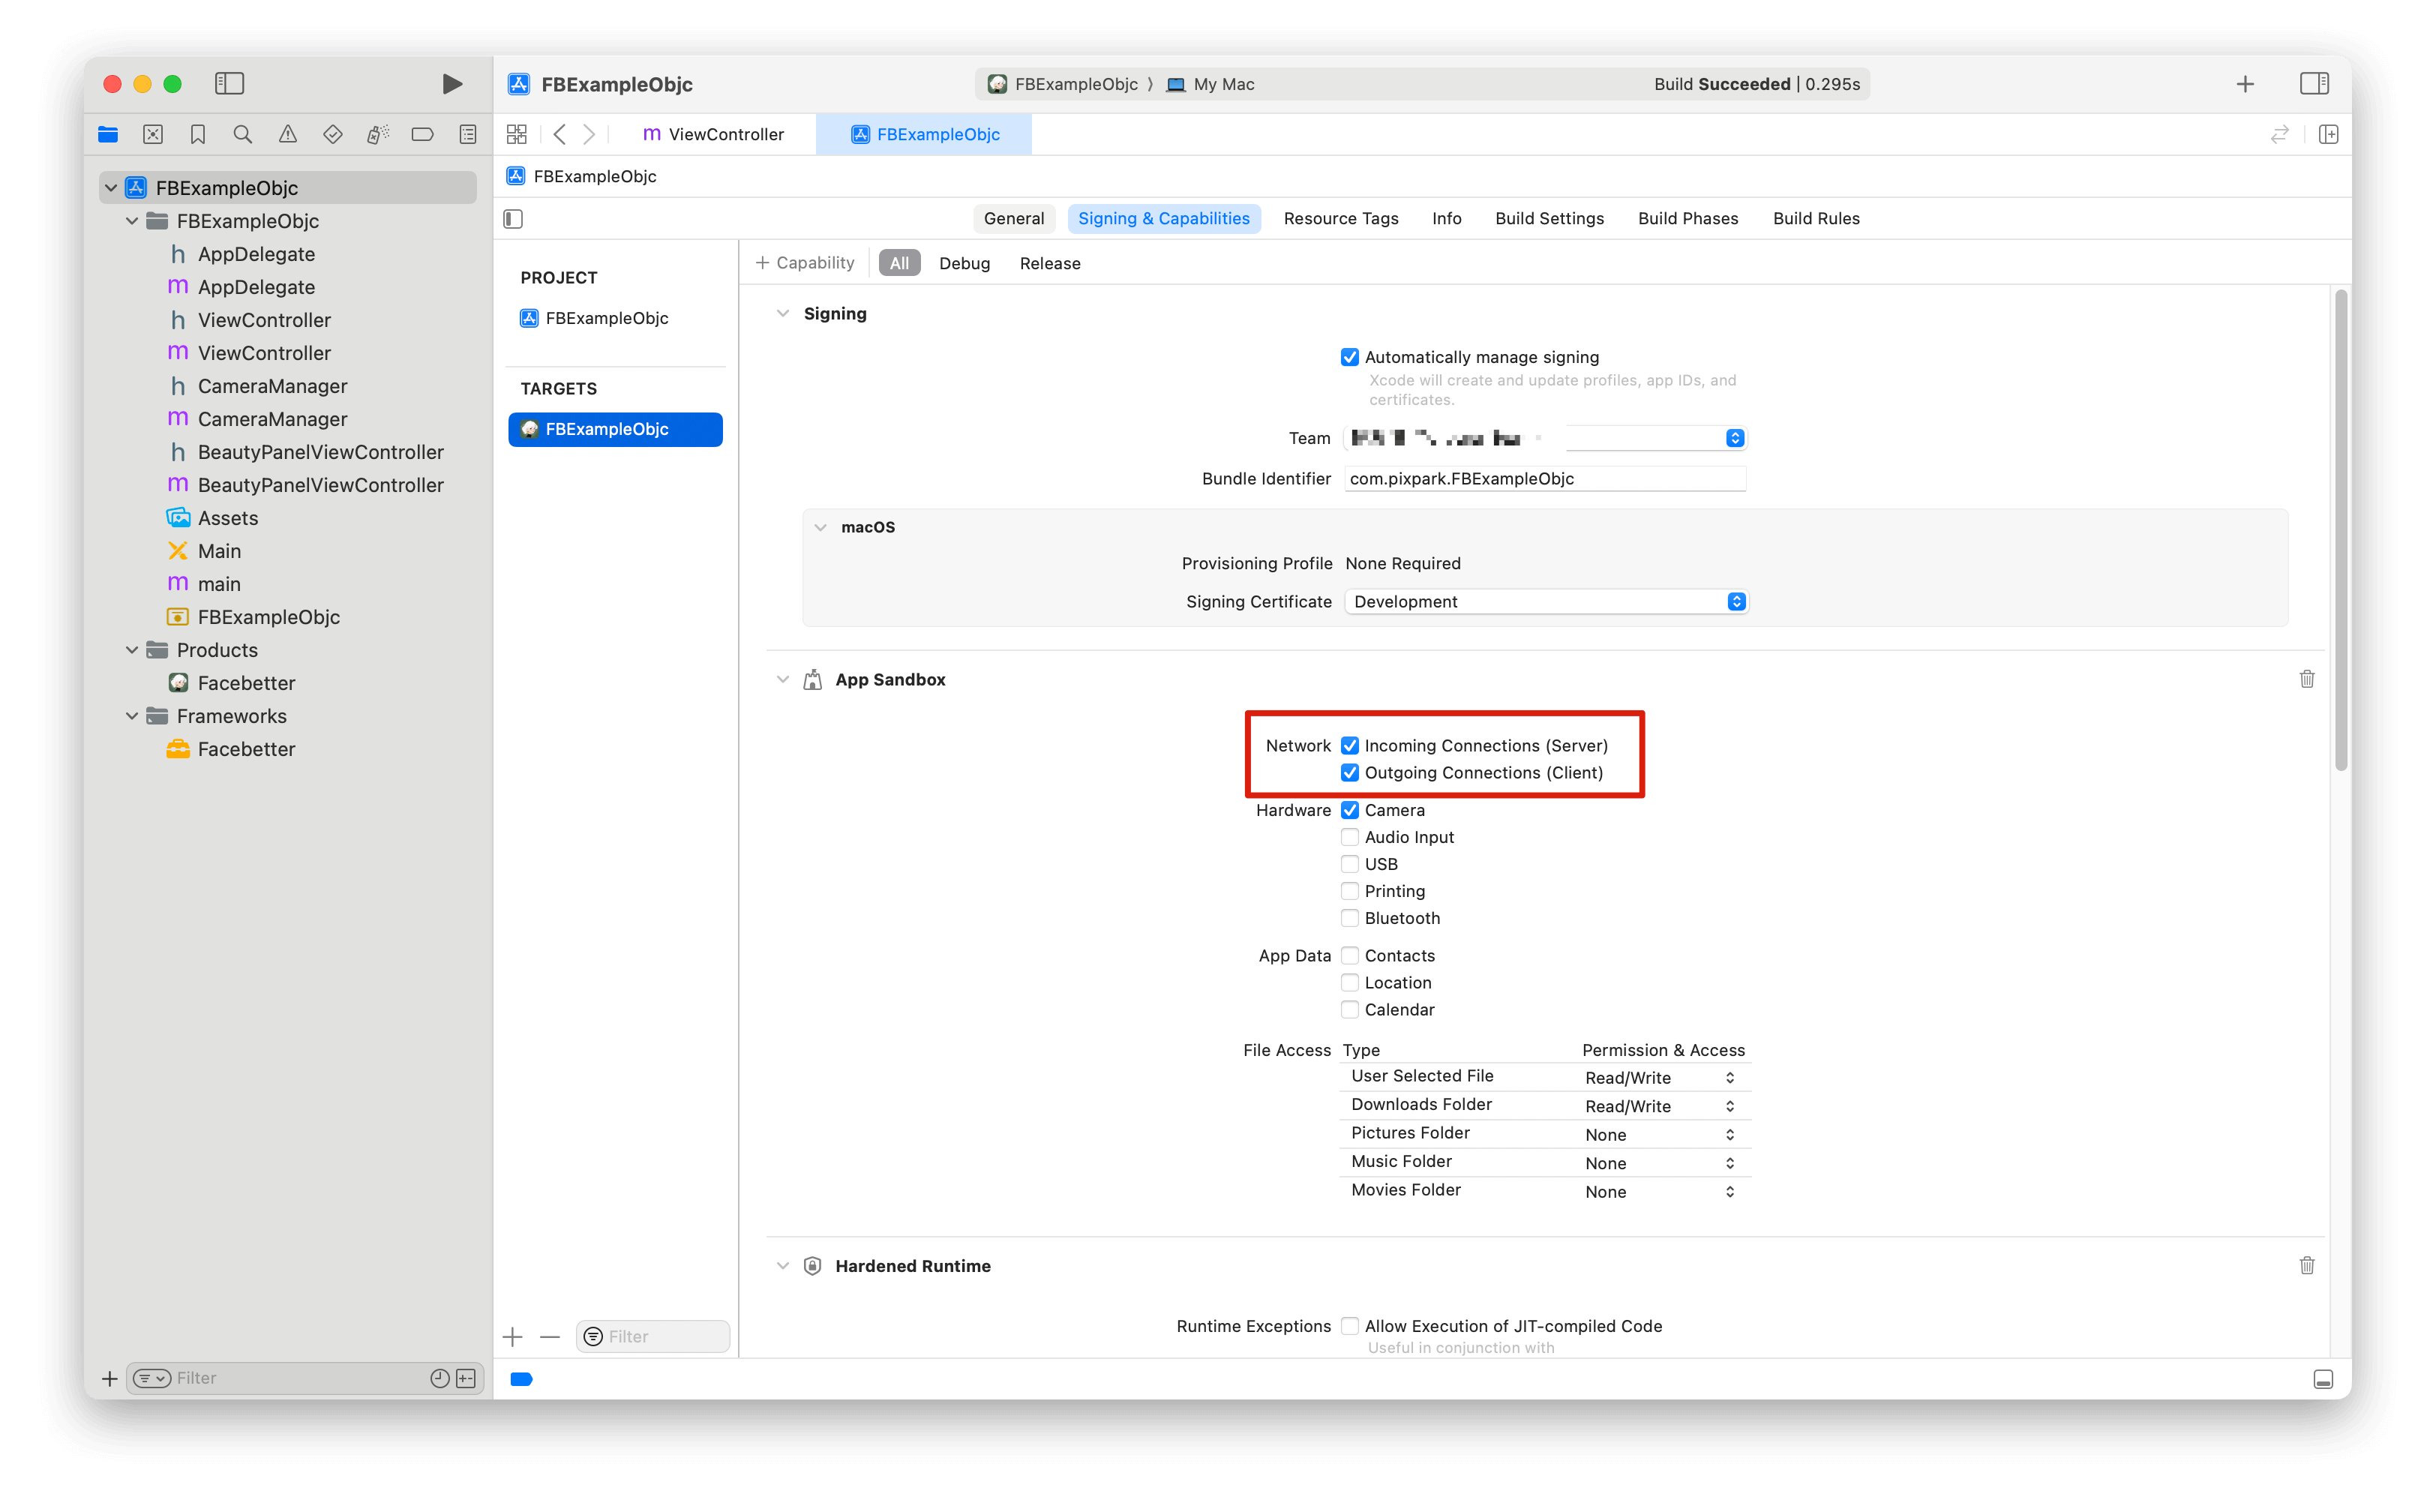
确保开放联网权限,用于校验 appkey
### 权限配置
确保开放联网权限,用于校验 appkey
 **权限说明:**
* **网络权限**:必需。SDK 需要联网验证 `appId` 和 `appKey`,确保应用正常运行。
## 导入头文件
```objc theme={null}
#import
```
## 日志配置
默认日志是关闭的,可以按需开启,支持控制台日志和文件日志开关。
开启日志要放到美颜引擎创建**之前**,否则可能看不到初始化日志。
```objc theme={null}
FBLogConfig* logConfig = [[FBLogConfig alloc] init];
// 日志级别
logConfig.level = FBLogLevel_Info;
// 控制台日志
logConfig.consoleEnabled = YES;
// 文件日志
logConfig.fileEnabled = YES;
logConfig.fileName = @"log path: xx/xx/facebetter.log";
```
## 创建配置引擎
按照 [此页面](/zh/intro/enable-service#获取-appid-和-appkey) 指引,获取 `appid` 和 `appkey`
**验证方式优先级:**
* 如果提供了 `licenseJson`,使用授权数据验证(支持在线响应和离线授权)
* 否则使用 `appId` 和 `appKey` 进行自动联网验证
```objc{2,3,4} theme={null}
FBEngineConfig *engineConfig = [[FBEngineConfig alloc] init];
engineConfig.appId = @"your appId"; // 配置你的 appid(可选,如果提供了 licenseJson 则不需要)
engineConfig.appKey = @"your appkey"; // 配置你的 appkey(可选,如果提供了 licenseJson 则不需要)
// 可选:使用授权数据验证(如果提供则优先使用)
// engineConfig.licenseJson = @"your license json string";
self.beautyEffectEngine = [FBBeautyEffectEngine createEngineWithConfig:engineConfig];
```
### 错误处理
创建引擎后建议检查是否成功:
```objc theme={null}
if (self.beautyEffectEngine == nil) {
NSLog(@"Failed to create beauty engine");
return;
}
```
## 使用滤镜和贴纸
滤镜和贴纸需要先注册资源文件(`.fbd`),然后再通过 `ID` 进行设置。
### 使用滤镜
```objc theme={null}
// 1. 注册滤镜资源(通常在初始化后执行一次)
NSString *filterId = @"chuxin";
NSString *fbdPath = [[NSBundle mainBundle] pathForResource:@"chuxin" ofType:@"fbd"];
[self.beautyEffectEngine registerFilter:filterId fbdFilePath:fbdPath];
// 2. 使用滤镜
[self.beautyEffectEngine setFilter:filterId];
// 3. 调节强度(0.0 - 1.0)
[self.beautyEffectEngine setFilterIntensity:0.8f];
// 4. 清除滤镜
[self.beautyEffectEngine setFilter:@""];
```
### 使用贴纸
```objc theme={null}
// 1. 注册贴纸资源
NSString *stickerId = @"cherry";
NSString *fbdPath = [[NSBundle mainBundle] pathForResource:@"cherry" ofType:@"fbd"];
[self.beautyEffectEngine registerSticker:stickerId fbdFilePath:fbdPath];
// 2. 使用贴纸
[self.beautyEffectEngine setSticker:stickerId];
// 3. 清除贴纸
[self.beautyEffectEngine setSticker:@""];
```
## 调节美颜参数
所有美颜参数值范围为 `[0.0, 1.0]`,设置为 `0` 即禁用效果。
### 设置美肤参数
通过 `setBasicParam` 接口,设置美肤参数,**参数范围 \[0.0, 1.0]**;
```objc theme={null}
[self.beautyEffectEngine setBasicParam:FBBasicParam_Smoothing floatValue:0.5f];
```
支持的美肤参数:
```objc theme={null}
typedef NS_ENUM(NSInteger, FBBasicParam) {
FBBasicParam_Smoothing = 0, // 磨皮
FBBasicParam_Sharpening, // 锐化
FBBasicParam_Whitening, // 美白
FBBasicParam_Rosiness, // 红润
};
```
### 设置美颜仅作用于皮肤区域
通过 `setSkinOnlyBeauty:` 接口,设置美颜是否仅作用于皮肤区域。当启用时,美颜效果(磨皮、美白等)仅会应用于检测到的皮肤区域,非皮肤区域保持不变。
```objc theme={null}
// 启用美颜仅作用于皮肤区域
[self.beautyEffectEngine setSkinOnlyBeauty:YES];
// 禁用美颜仅作用于皮肤区域(美颜作用于整张图像)
[self.beautyEffectEngine setSkinOnlyBeauty:NO];
```
启用皮肤区域美颜后,即使美颜参数值较高,非皮肤区域(如背景、衣物等)也不会受到影响。
### 设置美型参数
通过 `setReshapeParam` 接口,设置美型参数,**参数范围 \[0.0, 1.0]**;
```objc theme={null}
[self.beautyEffectEngine setReshapeParam:FBReshapeParam_FaceThin floatValue:0.5f];
```
支持从美型参数:
```objc theme={null}
typedef NS_ENUM(NSInteger, FBReshapeParam) {
FBReshapeParam_FaceThin = 0, // 瘦脸
FBReshapeParam_FaceVShape, // V脸
FBReshapeParam_FaceNarrow, // 窄脸
FBReshapeParam_FaceShort, // 短脸
FBReshapeParam_Cheekbone, // 颧骨
FBReshapeParam_Jawbone, // 下颌骨
FBReshapeParam_Chin, // 下巴
FBReshapeParam_NoseSlim, // 瘦鼻梁
FBReshapeParam_EyeSize, // 大眼
FBReshapeParam_EyeDistance, // 眼距
};
```
### 设置美妆参数
```objc theme={null}
[self.beautyEffectEngine setMakeupParam:FBMakeupParam_Lipstick floatValue:0.5f];
```
支持的美妆参数:
```objc theme={null}
typedef NS_ENUM(NSInteger, FBMakeupParam) {
FBMakeupParam_Lipstick = 0, // 口红
FBMakeupParam_Blush, // 腮红
};
```
### 设置虚拟背景
通过 `setVirtualBackgroundType:intensity:` 接口设置虚拟背景参数即可启用效果:
```objc theme={null}
// 设置模糊背景(参数值 > 0 表示启用)
[self.beautyEffectEngine setVirtualBackgroundType:FBVirtualBackgroundType_Blur intensity:0.5f];
// 设置纯色背景
[self.beautyEffectEngine setVirtualBackgroundType:FBVirtualBackgroundType_Color intensity:0.5f];
```
通过 `setVirtualBackground` 接口设置虚拟背景:
```objc theme={null}
// 设置背景模式
FBVirtualBackgroundOptions *options = [[FBVirtualBackgroundOptions alloc] initWithMode:FBBackgroundModeBlur];
[self.beautyEffectEngine setVirtualBackground:options];
// 设置背景图片(需要先设置为 Image 模式)
FBVirtualBackgroundOptions *imageOptions = [[FBVirtualBackgroundOptions alloc] initWithMode:FBBackgroundModeImage];
imageOptions.backgroundImage = backgroundImageFrame; // FBImageFrame 对象
[self.beautyEffectEngine setVirtualBackground:imageOptions];
```
## 使用滤镜和贴纸
### 滤镜功能
滤镜通过 `setFilter:` 接口设置,需要先通过 `registerFilter:fbdFilePath:` 注册滤镜资源文件(`.fbd`)。
```objc theme={null}
// 1. 注册滤镜资源
NSString *filterId = @"chuxin";
NSString *fbdPath = [[NSBundle mainBundle] pathForResource:@"chuxin" ofType:@"fbd"];
[self.beautyEffectEngine registerFilter:filterId fbdFilePath:fbdPath];
// 2. 使用滤镜
[self.beautyEffectEngine setFilter:filterId];
// 3. 调节滤镜强度 (0.0 - 1.0)
[self.beautyEffectEngine setFilterIntensity:0.8f];
```
### 贴纸功能
贴纸通过 `setSticker:` 接口设置,同样需要先注册。
```objc theme={null}
// 1. 注册贴纸资源
NSString *stickerId = @"cherry";
NSString *fbdPath = [[NSBundle mainBundle] pathForResource:@"cherry" ofType:@"fbd"];
[self.beautyEffectEngine registerSticker:stickerId fbdFilePath:fbdPath];
// 2. 使用贴纸
[self.beautyEffectEngine setSticker:stickerId];
// 3. 清除贴纸
[self.beautyEffectEngine setSticker:@""];
```
## 设置引擎回调
监听License验证和引擎初始化状态:
```objc theme={null}
FBEngineCallbacks *callbacks = [[FBEngineCallbacks alloc] init];
callbacks.onEngineEvent = ^(FBEngineEventCode code, NSString* _Nullable message) {
if (code == FBEngineEventCodeLicenseValidationSuccess) {
// License验证成功
NSLog(@"License验证成功");
} else if (code == FBEngineEventCodeLicenseValidationFailed) {
// License验证失败
NSLog(@"License验证失败: %@", message);
} else if (code == FBEngineEventCodeInitializationComplete) {
// 引擎初始化完成
NSLog(@"引擎初始化完成");
} else if (code == FBEngineEventCodeInitializationFailed) {
// 引擎初始化失败
NSLog(@"引擎初始化失败: %@", message);
}
};
[self.beautyEffectEngine setCallbacks:callbacks];
```
事件码:
* `FBEngineEventCodeLicenseValidationSuccess` (0):License验证成功
* `FBEngineEventCodeLicenseValidationFailed` (1):License验证失败
* `FBEngineEventCodeInitializationComplete` (100):引擎初始化完成
* `FBEngineEventCodeInitializationFailed` (101):引擎初始化失败
## 处理图像
### 创建图像
图像数据通过 `FBImageFrame` 封装,支持格式: `YUVI420`, `NV12`, `NV21`, `RGB`, `RGBA`, `BGR`, `BGRA`
**通过 rgba 创建 FBImageFrame**
```objc theme={null}
FBImageFrame *input_image = [FBImageFrame createWithRGBA:data width:width height:height stride:stride];
```
**通过图片创建 FBImageFrame**
```objc theme={null}
FBImageFrame *input_image = [FBImageFrame createWithFile:@"xxx.png"];
```
### 旋转图像
FBImageFrame 内置图像旋转方法, 可根据需要使用
```objc theme={null}
- (int)rotate:(FBImageRotation)rotation;
```
旋转角度
```objc theme={null}
typedef NS_ENUM(NSInteger, FBImageRotation) {
FBImageRotation0, // 0度
FBImageRotation90, // 顺时针旋转90度
FBImageRotation180, // 顺时针旋转180度
FBImageRotation270, // 顺时针旋转270度
};
```
### 处理图像
`processMode` 包括 Video 和 Image 两种,Video 适合直播,视频等场景使用,效率更高,Image 模式适合图片处理场景
```objc theme={null}
input_image.type = FBFrameTypeVideo;
FBImageFrame *output_image = [self.beautyEffectEngine processImage:input_image];
```
引擎会自动保持输入输出格式一致。输入为 RGBA 格式,输出即为 RGBA 格式;输入为 I420 格式,输出即为 I420 格式。
### 获取处理后图像数据
**获取 RGBA 格式数据**:
```objc theme={null}
// 如果输出格式是 RGBA,直接获取数据
if ([outputImage format] == FBImageFormatRGBA) {
const uint8_t* data = [outputImage data];
int dataSize = outputImage.size;
int width = outputImage.width;
int height = outputImage.height;
int stride = outputImage.stride;
}
```
**获取 I420 格式数据**:
```objc theme={null}
// 如果输出格式是 I420,直接获取 Y、U、V 分量数据
if ([outputImage format] == FBImageFormatI420) {
// 独立获取 Y, U, V 分量数据
const uint8_t* dataY = [outputImage dataY];
const uint8_t* dataU = [outputImage dataU];
const uint8_t* dataV = [outputImage dataV];
int strideY = [outputImage strideY];
int strideU = [outputImage strideU];
int strideV = [outputImage strideV];
int width = outputImage.width;
int height = outputImage.height;
}
```
**格式转换**:
如果需要将 FBImageFrame 转换为其他格式,可以使用 `convert:` 方法:
```objc theme={null}
// 转换为 I420 格式
FBImageFrame *i420Frame = [outputImage convert:FBImageFormatI420];
if (i420Frame) {
const uint8_t* dataY = [i420Frame dataY];
const uint8_t* dataU = [i420Frame dataU];
const uint8_t* dataV = [i420Frame dataV];
// 使用完毕后,ARC 会自动释放
}
// 转换为 RGBA 格式
FBImageFrame *rgbaFrame = [outputImage convert:FBImageFormatRGBA];
if (rgbaFrame) {
const uint8_t* data = [rgbaFrame data];
// 使用完毕后,ARC 会自动释放
}
```
`FBImageFrame` 支持转换为以下格式: `I420`, `NV12`, `NV21`, `RGB`, `RGBA`, `BGR`, `BGRA`。
## 生命周期管理
FBBeautyEffectEngine 是单例,App 结束时自动释放,无需手动管理。
### 释放资源
在 ViewController 销毁时,务必释放引擎资源:
```objc theme={null}
- (void)dealloc {
if (self.beautyEffectEngine) {
// 注意:FBBeautyEffectEngine 是单例,通常不需要手动释放
// 但如果有自定义的清理逻辑,可以在这里处理
self.beautyEffectEngine = nil;
}
}
```
### 内存管理
* 及时释放 `FBImageFrame` 对象(ARC 会自动管理)
* 避免在循环中重复创建大量图像对象
* 建议复用 `FBImageFrame` 对象
```objc theme={null}
// 使用完毕后释放资源
if (inputImage) {
inputImage = nil; // ARC 会自动释放
}
if (outputImage) {
outputImage = nil; // ARC 会自动释放
}
// 格式转换后的 frame,ARC 也会自动释放
if (i420Frame) {
i420Frame = nil; // ARC 会自动释放
}
```
## 相关文档
* [最佳实践](/zh/macos/best-practices) - 性能优化和架构设计建议
* [常见问题](/zh/macos/faq) - 常见问题解答和故障排除
* [API 参考](/zh/macos/api-reference) - 完整的 API 文档
**权限说明:**
* **网络权限**:必需。SDK 需要联网验证 `appId` 和 `appKey`,确保应用正常运行。
## 导入头文件
```objc theme={null}
#import
```
## 日志配置
默认日志是关闭的,可以按需开启,支持控制台日志和文件日志开关。
开启日志要放到美颜引擎创建**之前**,否则可能看不到初始化日志。
```objc theme={null}
FBLogConfig* logConfig = [[FBLogConfig alloc] init];
// 日志级别
logConfig.level = FBLogLevel_Info;
// 控制台日志
logConfig.consoleEnabled = YES;
// 文件日志
logConfig.fileEnabled = YES;
logConfig.fileName = @"log path: xx/xx/facebetter.log";
```
## 创建配置引擎
按照 [此页面](/zh/intro/enable-service#获取-appid-和-appkey) 指引,获取 `appid` 和 `appkey`
**验证方式优先级:**
* 如果提供了 `licenseJson`,使用授权数据验证(支持在线响应和离线授权)
* 否则使用 `appId` 和 `appKey` 进行自动联网验证
```objc{2,3,4} theme={null}
FBEngineConfig *engineConfig = [[FBEngineConfig alloc] init];
engineConfig.appId = @"your appId"; // 配置你的 appid(可选,如果提供了 licenseJson 则不需要)
engineConfig.appKey = @"your appkey"; // 配置你的 appkey(可选,如果提供了 licenseJson 则不需要)
// 可选:使用授权数据验证(如果提供则优先使用)
// engineConfig.licenseJson = @"your license json string";
self.beautyEffectEngine = [FBBeautyEffectEngine createEngineWithConfig:engineConfig];
```
### 错误处理
创建引擎后建议检查是否成功:
```objc theme={null}
if (self.beautyEffectEngine == nil) {
NSLog(@"Failed to create beauty engine");
return;
}
```
## 使用滤镜和贴纸
滤镜和贴纸需要先注册资源文件(`.fbd`),然后再通过 `ID` 进行设置。
### 使用滤镜
```objc theme={null}
// 1. 注册滤镜资源(通常在初始化后执行一次)
NSString *filterId = @"chuxin";
NSString *fbdPath = [[NSBundle mainBundle] pathForResource:@"chuxin" ofType:@"fbd"];
[self.beautyEffectEngine registerFilter:filterId fbdFilePath:fbdPath];
// 2. 使用滤镜
[self.beautyEffectEngine setFilter:filterId];
// 3. 调节强度(0.0 - 1.0)
[self.beautyEffectEngine setFilterIntensity:0.8f];
// 4. 清除滤镜
[self.beautyEffectEngine setFilter:@""];
```
### 使用贴纸
```objc theme={null}
// 1. 注册贴纸资源
NSString *stickerId = @"cherry";
NSString *fbdPath = [[NSBundle mainBundle] pathForResource:@"cherry" ofType:@"fbd"];
[self.beautyEffectEngine registerSticker:stickerId fbdFilePath:fbdPath];
// 2. 使用贴纸
[self.beautyEffectEngine setSticker:stickerId];
// 3. 清除贴纸
[self.beautyEffectEngine setSticker:@""];
```
## 调节美颜参数
所有美颜参数值范围为 `[0.0, 1.0]`,设置为 `0` 即禁用效果。
### 设置美肤参数
通过 `setBasicParam` 接口,设置美肤参数,**参数范围 \[0.0, 1.0]**;
```objc theme={null}
[self.beautyEffectEngine setBasicParam:FBBasicParam_Smoothing floatValue:0.5f];
```
支持的美肤参数:
```objc theme={null}
typedef NS_ENUM(NSInteger, FBBasicParam) {
FBBasicParam_Smoothing = 0, // 磨皮
FBBasicParam_Sharpening, // 锐化
FBBasicParam_Whitening, // 美白
FBBasicParam_Rosiness, // 红润
};
```
### 设置美颜仅作用于皮肤区域
通过 `setSkinOnlyBeauty:` 接口,设置美颜是否仅作用于皮肤区域。当启用时,美颜效果(磨皮、美白等)仅会应用于检测到的皮肤区域,非皮肤区域保持不变。
```objc theme={null}
// 启用美颜仅作用于皮肤区域
[self.beautyEffectEngine setSkinOnlyBeauty:YES];
// 禁用美颜仅作用于皮肤区域(美颜作用于整张图像)
[self.beautyEffectEngine setSkinOnlyBeauty:NO];
```
启用皮肤区域美颜后,即使美颜参数值较高,非皮肤区域(如背景、衣物等)也不会受到影响。
### 设置美型参数
通过 `setReshapeParam` 接口,设置美型参数,**参数范围 \[0.0, 1.0]**;
```objc theme={null}
[self.beautyEffectEngine setReshapeParam:FBReshapeParam_FaceThin floatValue:0.5f];
```
支持从美型参数:
```objc theme={null}
typedef NS_ENUM(NSInteger, FBReshapeParam) {
FBReshapeParam_FaceThin = 0, // 瘦脸
FBReshapeParam_FaceVShape, // V脸
FBReshapeParam_FaceNarrow, // 窄脸
FBReshapeParam_FaceShort, // 短脸
FBReshapeParam_Cheekbone, // 颧骨
FBReshapeParam_Jawbone, // 下颌骨
FBReshapeParam_Chin, // 下巴
FBReshapeParam_NoseSlim, // 瘦鼻梁
FBReshapeParam_EyeSize, // 大眼
FBReshapeParam_EyeDistance, // 眼距
};
```
### 设置美妆参数
```objc theme={null}
[self.beautyEffectEngine setMakeupParam:FBMakeupParam_Lipstick floatValue:0.5f];
```
支持的美妆参数:
```objc theme={null}
typedef NS_ENUM(NSInteger, FBMakeupParam) {
FBMakeupParam_Lipstick = 0, // 口红
FBMakeupParam_Blush, // 腮红
};
```
### 设置虚拟背景
通过 `setVirtualBackgroundType:intensity:` 接口设置虚拟背景参数即可启用效果:
```objc theme={null}
// 设置模糊背景(参数值 > 0 表示启用)
[self.beautyEffectEngine setVirtualBackgroundType:FBVirtualBackgroundType_Blur intensity:0.5f];
// 设置纯色背景
[self.beautyEffectEngine setVirtualBackgroundType:FBVirtualBackgroundType_Color intensity:0.5f];
```
通过 `setVirtualBackground` 接口设置虚拟背景:
```objc theme={null}
// 设置背景模式
FBVirtualBackgroundOptions *options = [[FBVirtualBackgroundOptions alloc] initWithMode:FBBackgroundModeBlur];
[self.beautyEffectEngine setVirtualBackground:options];
// 设置背景图片(需要先设置为 Image 模式)
FBVirtualBackgroundOptions *imageOptions = [[FBVirtualBackgroundOptions alloc] initWithMode:FBBackgroundModeImage];
imageOptions.backgroundImage = backgroundImageFrame; // FBImageFrame 对象
[self.beautyEffectEngine setVirtualBackground:imageOptions];
```
## 使用滤镜和贴纸
### 滤镜功能
滤镜通过 `setFilter:` 接口设置,需要先通过 `registerFilter:fbdFilePath:` 注册滤镜资源文件(`.fbd`)。
```objc theme={null}
// 1. 注册滤镜资源
NSString *filterId = @"chuxin";
NSString *fbdPath = [[NSBundle mainBundle] pathForResource:@"chuxin" ofType:@"fbd"];
[self.beautyEffectEngine registerFilter:filterId fbdFilePath:fbdPath];
// 2. 使用滤镜
[self.beautyEffectEngine setFilter:filterId];
// 3. 调节滤镜强度 (0.0 - 1.0)
[self.beautyEffectEngine setFilterIntensity:0.8f];
```
### 贴纸功能
贴纸通过 `setSticker:` 接口设置,同样需要先注册。
```objc theme={null}
// 1. 注册贴纸资源
NSString *stickerId = @"cherry";
NSString *fbdPath = [[NSBundle mainBundle] pathForResource:@"cherry" ofType:@"fbd"];
[self.beautyEffectEngine registerSticker:stickerId fbdFilePath:fbdPath];
// 2. 使用贴纸
[self.beautyEffectEngine setSticker:stickerId];
// 3. 清除贴纸
[self.beautyEffectEngine setSticker:@""];
```
## 设置引擎回调
监听License验证和引擎初始化状态:
```objc theme={null}
FBEngineCallbacks *callbacks = [[FBEngineCallbacks alloc] init];
callbacks.onEngineEvent = ^(FBEngineEventCode code, NSString* _Nullable message) {
if (code == FBEngineEventCodeLicenseValidationSuccess) {
// License验证成功
NSLog(@"License验证成功");
} else if (code == FBEngineEventCodeLicenseValidationFailed) {
// License验证失败
NSLog(@"License验证失败: %@", message);
} else if (code == FBEngineEventCodeInitializationComplete) {
// 引擎初始化完成
NSLog(@"引擎初始化完成");
} else if (code == FBEngineEventCodeInitializationFailed) {
// 引擎初始化失败
NSLog(@"引擎初始化失败: %@", message);
}
};
[self.beautyEffectEngine setCallbacks:callbacks];
```
事件码:
* `FBEngineEventCodeLicenseValidationSuccess` (0):License验证成功
* `FBEngineEventCodeLicenseValidationFailed` (1):License验证失败
* `FBEngineEventCodeInitializationComplete` (100):引擎初始化完成
* `FBEngineEventCodeInitializationFailed` (101):引擎初始化失败
## 处理图像
### 创建图像
图像数据通过 `FBImageFrame` 封装,支持格式: `YUVI420`, `NV12`, `NV21`, `RGB`, `RGBA`, `BGR`, `BGRA`
**通过 rgba 创建 FBImageFrame**
```objc theme={null}
FBImageFrame *input_image = [FBImageFrame createWithRGBA:data width:width height:height stride:stride];
```
**通过图片创建 FBImageFrame**
```objc theme={null}
FBImageFrame *input_image = [FBImageFrame createWithFile:@"xxx.png"];
```
### 旋转图像
FBImageFrame 内置图像旋转方法, 可根据需要使用
```objc theme={null}
- (int)rotate:(FBImageRotation)rotation;
```
旋转角度
```objc theme={null}
typedef NS_ENUM(NSInteger, FBImageRotation) {
FBImageRotation0, // 0度
FBImageRotation90, // 顺时针旋转90度
FBImageRotation180, // 顺时针旋转180度
FBImageRotation270, // 顺时针旋转270度
};
```
### 处理图像
`processMode` 包括 Video 和 Image 两种,Video 适合直播,视频等场景使用,效率更高,Image 模式适合图片处理场景
```objc theme={null}
input_image.type = FBFrameTypeVideo;
FBImageFrame *output_image = [self.beautyEffectEngine processImage:input_image];
```
引擎会自动保持输入输出格式一致。输入为 RGBA 格式,输出即为 RGBA 格式;输入为 I420 格式,输出即为 I420 格式。
### 获取处理后图像数据
**获取 RGBA 格式数据**:
```objc theme={null}
// 如果输出格式是 RGBA,直接获取数据
if ([outputImage format] == FBImageFormatRGBA) {
const uint8_t* data = [outputImage data];
int dataSize = outputImage.size;
int width = outputImage.width;
int height = outputImage.height;
int stride = outputImage.stride;
}
```
**获取 I420 格式数据**:
```objc theme={null}
// 如果输出格式是 I420,直接获取 Y、U、V 分量数据
if ([outputImage format] == FBImageFormatI420) {
// 独立获取 Y, U, V 分量数据
const uint8_t* dataY = [outputImage dataY];
const uint8_t* dataU = [outputImage dataU];
const uint8_t* dataV = [outputImage dataV];
int strideY = [outputImage strideY];
int strideU = [outputImage strideU];
int strideV = [outputImage strideV];
int width = outputImage.width;
int height = outputImage.height;
}
```
**格式转换**:
如果需要将 FBImageFrame 转换为其他格式,可以使用 `convert:` 方法:
```objc theme={null}
// 转换为 I420 格式
FBImageFrame *i420Frame = [outputImage convert:FBImageFormatI420];
if (i420Frame) {
const uint8_t* dataY = [i420Frame dataY];
const uint8_t* dataU = [i420Frame dataU];
const uint8_t* dataV = [i420Frame dataV];
// 使用完毕后,ARC 会自动释放
}
// 转换为 RGBA 格式
FBImageFrame *rgbaFrame = [outputImage convert:FBImageFormatRGBA];
if (rgbaFrame) {
const uint8_t* data = [rgbaFrame data];
// 使用完毕后,ARC 会自动释放
}
```
`FBImageFrame` 支持转换为以下格式: `I420`, `NV12`, `NV21`, `RGB`, `RGBA`, `BGR`, `BGRA`。
## 生命周期管理
FBBeautyEffectEngine 是单例,App 结束时自动释放,无需手动管理。
### 释放资源
在 ViewController 销毁时,务必释放引擎资源:
```objc theme={null}
- (void)dealloc {
if (self.beautyEffectEngine) {
// 注意:FBBeautyEffectEngine 是单例,通常不需要手动释放
// 但如果有自定义的清理逻辑,可以在这里处理
self.beautyEffectEngine = nil;
}
}
```
### 内存管理
* 及时释放 `FBImageFrame` 对象(ARC 会自动管理)
* 避免在循环中重复创建大量图像对象
* 建议复用 `FBImageFrame` 对象
```objc theme={null}
// 使用完毕后释放资源
if (inputImage) {
inputImage = nil; // ARC 会自动释放
}
if (outputImage) {
outputImage = nil; // ARC 会自动释放
}
// 格式转换后的 frame,ARC 也会自动释放
if (i420Frame) {
i420Frame = nil; // ARC 会自动释放
}
```
## 相关文档
* [最佳实践](/zh/macos/best-practices) - 性能优化和架构设计建议
* [常见问题](/zh/macos/faq) - 常见问题解答和故障排除
* [API 参考](/zh/macos/api-reference) - 完整的 API 文档