> ## Documentation Index
> Fetch the complete documentation index at: https://docs.facebetter.net/llms.txt
> Use this file to discover all available pages before exploring further.
# 美顔の実装
> Facebetter SDK 2.0 で macOS 美顔を実装します
このページは SDK **2.0.0** に対応します。認証: [認証とライセンス](/ja/intro/license)。メイク / リシェイプ列挙: [パラメータ列挙](/ja/intro/makeup)。
## SDK 依存関係の追加
### 方法 A: CocoaPods(推奨)
```ruby theme={null}
target 'YourTargetName' do
pod 'Facebetter', '2.0.0'
end
```
```bash theme={null}
pod install
```
**Xcode 15+ のコンパイルエラー**
**Xcode 15** 以降では、コンパイル時に `Sandbox: rsync.samba deny(1)` が出ることがあります。原因は **User Script Sandboxing** です。
**対処:**
1. Xcode で **Project** を選びます。
2. **Build Settings** を開きます。
3. `ENABLE_USER_SCRIPT_SANDBOXING` を検索します。
4. 値を `Yes` から **`No`** に変更します。
### 方法 B: Framework の手動統合
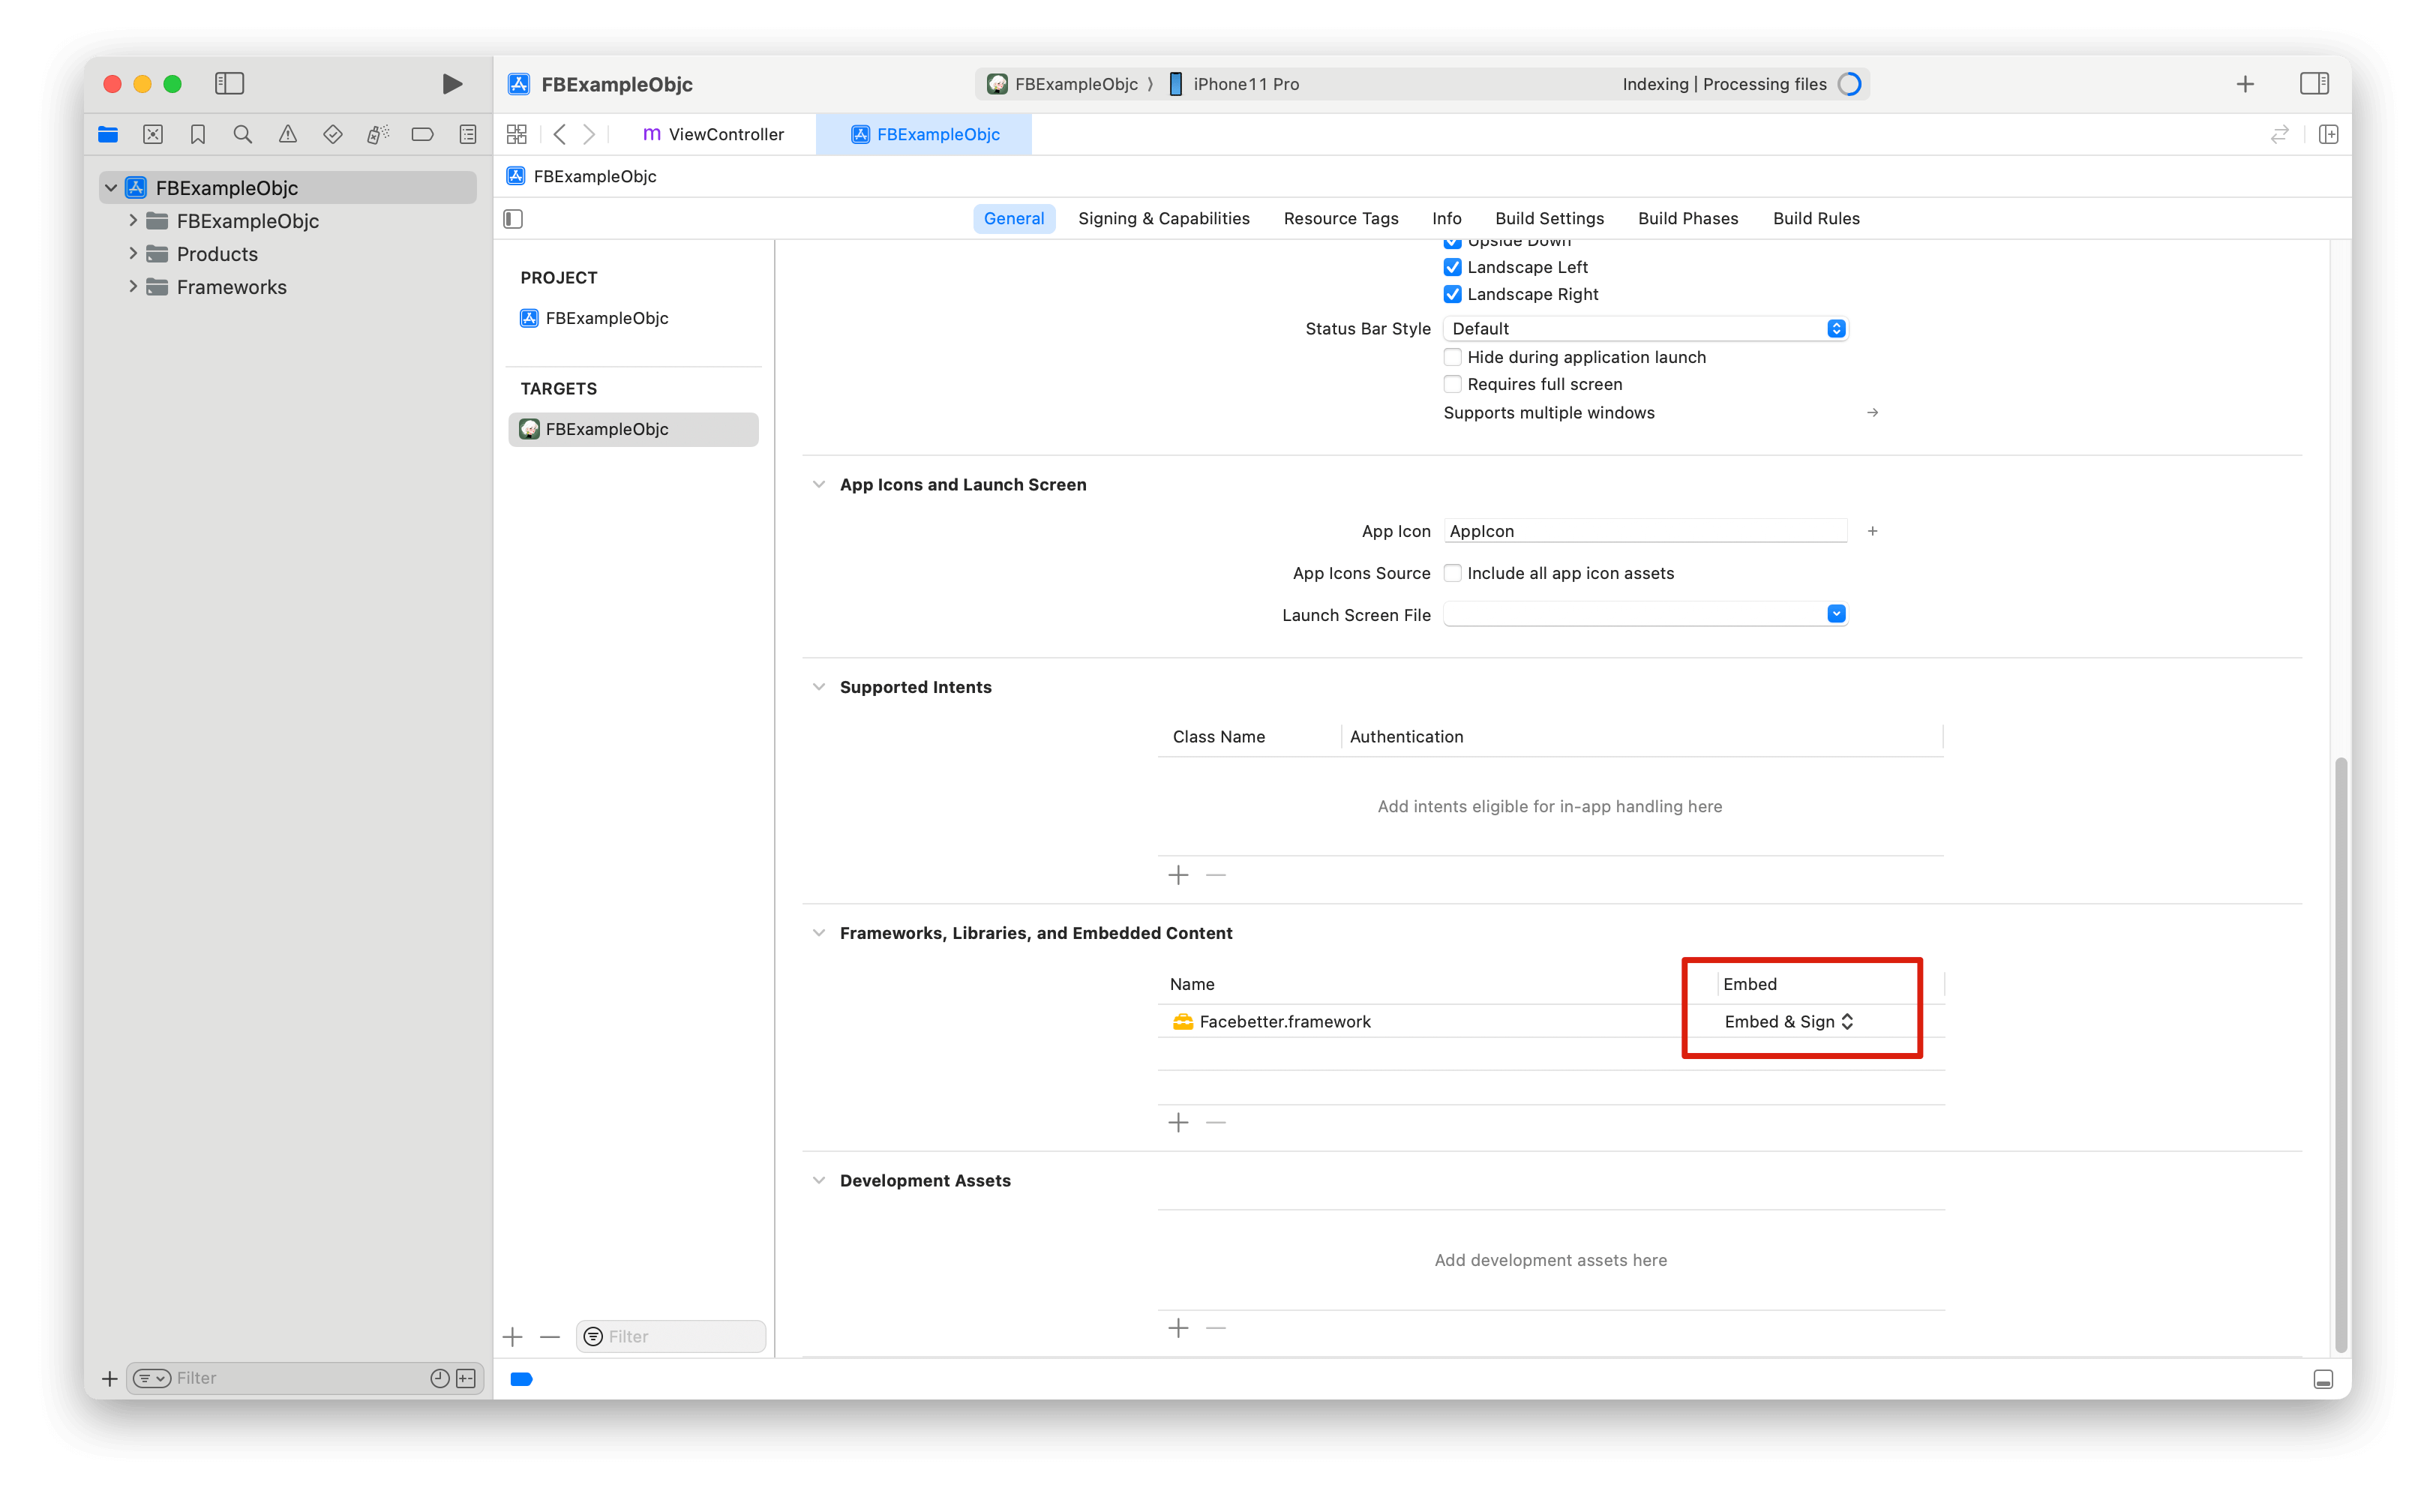
[ダウンロード](https://facebetter.net/ja/download) から SDK を取得し、`Facebetter.framework` をプロジェクトへコピーします。[動的ライブラリの埋め込み](https://help.apple.com/xcode/mac/current/#/dev51a648b07) に従い、**Embed** を **Embed & Sign** に設定します。
 ### 権限
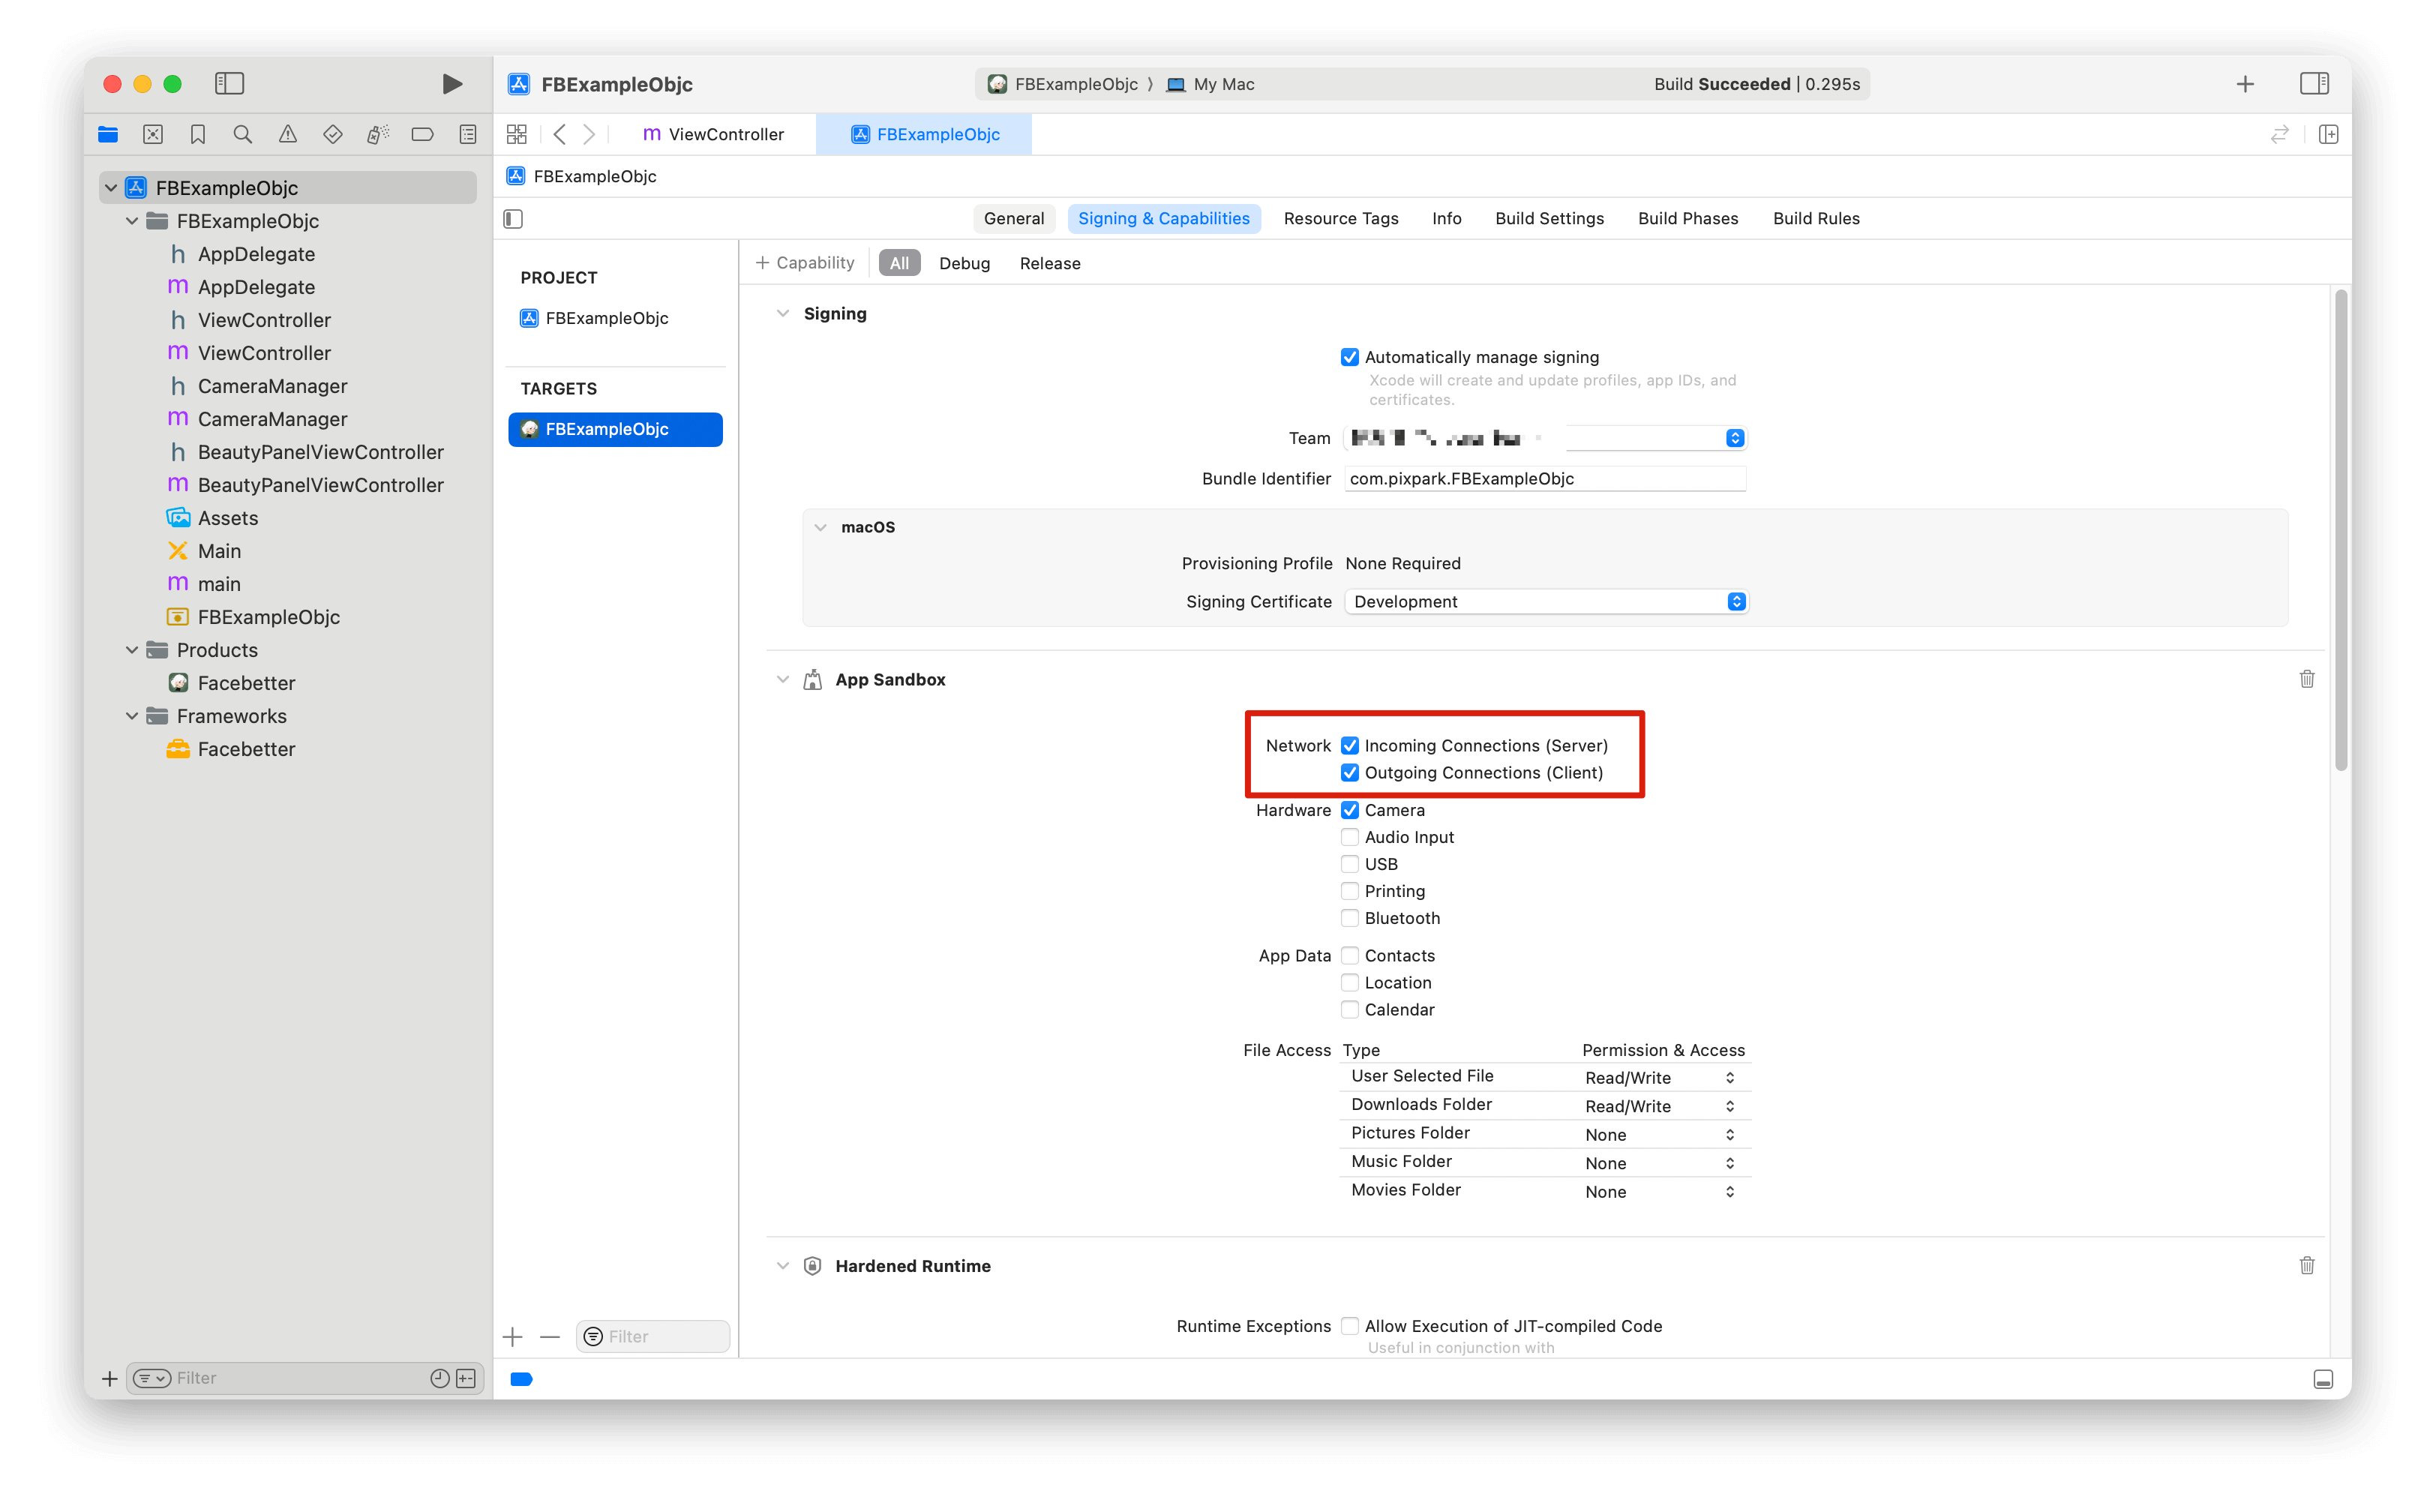
オンラインの `appId` / `appKey` を使うサンドボックス Mac アプリは、送信ネットワークを許可する必要があります。
### 権限
オンラインの `appId` / `appKey` を使うサンドボックス Mac アプリは、送信ネットワークを許可する必要があります。
 カメラ(任意): `Info.plist` に `NSCameraUsageDescription` を追加します。
## ヘッダーのインポート
```objc theme={null}
#import
```
AppKit 型(`NSImage`)には `#import ` が必要です(macOS では通常、エンジンヘッダーまたはプレフィックスヘッダーで導入済みです)。
## ログ設定
ログはデフォルトでオフです。エンジン作成の**前**に `setLogConfig:` を呼び出す必要があります。
```objc theme={null}
FBLogConfig *logConfig = [[FBLogConfig alloc] init];
logConfig.level = FBLogLevel_Info;
logConfig.consoleEnabled = YES;
logConfig.fileEnabled = YES;
logConfig.fileName = @"/path/in/container/facebetter.log";
[FBBeautyEffectEngine setLogConfig:logConfig];
```
## エンジンの作成
macOS Bundle ID をバインドし、`licenseToken` または `appId` + `appKey` を渡します。[AppID と AppKey の取得](/ja/intro/enable-service#appid-と-appkey-の取得) と [認証とライセンス](/ja/intro/license) を参照してください。
**優先順位:** `licenseToken` が空でない(ライセンストークン、`{token}` JSON、または `.lic` の内容)場合はローカル検証。それ以外は `appId` + `appKey` で `/facebetter/v2/auth` を呼び出します。
```objc theme={null}
FBEngineConfig *engineConfig = [[FBEngineConfig alloc] init];
engineConfig.appId = @"your appId";
engineConfig.appKey = @"your appKey";
// engineConfig.licenseToken = @"your license token";
engineConfig.externalContext = NO; // YES only when you own the GL context
self.beautyEffectEngine = [FBBeautyEffectEngine createEngineWithConfig:engineConfig];
if (self.beautyEffectEngine == nil) {
NSLog(@"Failed to create beauty engine");
return;
}
```
`createEngineWithConfig:` が返すのは**インスタンス**であり、シングルトンではありません。
## 美肌
強度は通常 `[0.0, 1.0]` です。スタイル列挙: [パラメータ列挙](/ja/intro/makeup)。
```objc theme={null}
[self.beautyEffectEngine setSmoothing:0.5f];
[self.beautyEffectEngine setSmoothingStyle:FBSmoothingStyle_Natural];
[self.beautyEffectEngine setWhitening:0.3f];
[self.beautyEffectEngine setWhiteningStyle:FBWhiteningStyle_ColdWhite];
[self.beautyEffectEngine setSharpening:0.2f];
[self.beautyEffectEngine setRosiness:0.15f];
```
### 肌領域のみ
オンにすると、スムージング / 美白 / 血色は検出された肌にのみ適用されます。
```objc theme={null}
[self.beautyEffectEngine setBeautySkinOnly:YES];
```
## リシェイプ
`setReshape:intensity:` の範囲は **`[-1.0, 1.0]`** です。`0` はオフです。パラメータ: `FBReshape_FaceThin` … `FBReshape_BrowThickness`(`0`–`25`)。意味: [パラメータ列挙](/ja/intro/makeup)。
```objc theme={null}
[self.beautyEffectEngine setReshape:FBReshape_FaceThin intensity:0.4f];
[self.beautyEffectEngine setReshape:FBReshape_EyeSize intensity:0.2f];
```
## ボディリシェイプ
`setBodyReshape:intensity:` の範囲は **`[0.0, 1.0]`** です。`0` はオフです。先に `addResourcePack:` で `resource_body.fbd` を登録してください。パラメータ: `FBBodyReshape_BodySlim` … `FBBodyReshape_TorsoLong`(`0`–`8`)。[パラメータ列挙](/ja/intro/makeup) と [オプションリソースパック](/ja/intro/resource-packs)。
```objc theme={null}
NSString *bodyPack = [[NSBundle mainBundle] pathForResource:@"resource_body" ofType:@"fbd"];
[self.beautyEffectEngine addResourcePack:bodyPack];
[self.beautyEffectEngine setBodyReshape:FBBodyReshape_WaistSlim intensity:0.4f];
[self.beautyEffectEngine setBodyReshape:FBBodyReshape_LegStretch intensity:0.3f];
[self.beautyEffectEngine setBodyReshape:FBBodyReshape_TorsoLong intensity:0.3f];
```
## メイク
強度、形状、色を分けて設定します。完全なプリセット: [パラメータ列挙](/ja/intro/makeup)。
```objc theme={null}
[self.beautyEffectEngine setLipstick:0.5f];
[self.beautyEffectEngine setLipstickColor:FBLipstickColor_Rouge];
[self.beautyEffectEngine setBlush:0.4f];
[self.beautyEffectEngine setBlushStyle:FBBlushStyle_SunKissed];
[self.beautyEffectEngine setBlushColor:FBBlushColor_CoralPink];
[self.beautyEffectEngine setContour:0.35f];
[self.beautyEffectEngine setContourStyle:FBContourStyle_Natural];
[self.beautyEffectEngine setEyeShadow:0.4f];
[self.beautyEffectEngine setEyeShadowStyle:FBEyeShadowStyle_Soft];
[self.beautyEffectEngine setEyeShadowColor:FBEyeShadowColor_Plum];
[self.beautyEffectEngine setEyeLiner:0.4f];
[self.beautyEffectEngine setEyeLinerStyle:FBEyeLinerStyle_Classic];
[self.beautyEffectEngine setEyeLinerColor:FBEyeLinerColor_Coffee];
[self.beautyEffectEngine setEyebrow:0.4f];
[self.beautyEffectEngine setEyebrowStyle:FBEyebrowStyle_Natural];
[self.beautyEffectEngine setEyebrowColor:FBEyebrowColor_DarkBrown];
[self.beautyEffectEngine setEyelash:0.4f];
[self.beautyEffectEngine setEyelashStyle:FBEyelashStyle_Classic];
[self.beautyEffectEngine setEyelashColor:FBEyelashColor_Black];
[self.beautyEffectEngine setPupil:0.4f];
[self.beautyEffectEngine setPupilColor:FBPupilColor_Hazel];
```
## バーチャル背景
デフォルトのマスクはポートレートセグメンテーションです。ぼかし強度 `[0.0, 1.0]`、`0` でぼかしをクリアします。画像パスは空でない png/jpg である必要があります。
```objc theme={null}
[self.beautyEffectEngine setVirtualBackgroundBlur:0.6f];
[self.beautyEffectEngine setVirtualBackground:imagePath];
[self.beautyEffectEngine setVirtualBackgroundWithData:pngOrJpegData];
[self.beautyEffectEngine clearVirtualBackground];
```
### クロマキー
クロマキーはマスクだけを置き換えます。塗りつぶしはぼかしまたは置換画像のままです。
```objc theme={null}
[self.beautyEffectEngine setChromaKey:FBChromaKeyColor_Green];
[self.beautyEffectEngine setChromaKeySimilarity:0.4f];
[self.beautyEffectEngine setChromaKeySmoothness:0.3f];
[self.beautyEffectEngine setChromaKeyDesaturation:0.2f];
[self.beautyEffectEngine clearChromaKey]; // back to portrait segmentation
```
## フィルターとステッカー
`.fbd` ファイルパスまたはメモリバイトを渡します。
```objc theme={null}
NSString *filterPath = [[NSBundle mainBundle] pathForResource:@"chuxin" ofType:@"fbd"];
[self.beautyEffectEngine setFilter:filterPath];
[self.beautyEffectEngine setFilterIntensity:0.8f];
[self.beautyEffectEngine clearFilter];
NSData *filterData = [NSData dataWithContentsOfFile:filterPath];
[self.beautyEffectEngine setFilterWithData:filterData];
NSString *stickerPath = [[NSBundle mainBundle] pathForResource:@"cherry" ofType:@"fbd"];
[self.beautyEffectEngine setSticker:stickerPath];
[self.beautyEffectEngine clearSticker];
[self.beautyEffectEngine setStickerWithData:stickerData];
```
3D ステッカーにはオプションパック `resource_3d.fbd` が必要です(framework には含まれません)。[オプションリソースパック](/ja/intro/resource-packs) を参照してください。
```objc theme={null}
NSString *packPath = [[NSBundle mainBundle] pathForResource:@"resource_3d" ofType:@"fbd"];
[self.beautyEffectEngine addResourcePack:packPath];
NSString *sticker3dPath = [[NSBundle mainBundle] pathForResource:@"oculos" ofType:@"fbd"];
[self.beautyEffectEngine set3DSticker:sticker3dPath];
[self.beautyEffectEngine clear3DSticker];
```
## コールバックと統計
```objc theme={null}
FBEngineCallbacks *callbacks = [[FBEngineCallbacks alloc] init];
__weak typeof(self) weakSelf = self;
callbacks.onEngineEvent = ^(FBEngineEventCode code, NSString * _Nullable message) {
// 0 license OK, 1 license failed, 100 init complete, 101 init failed
NSLog(@"engine event %ld %@", (long)code, message);
};
callbacks.onFaceLandmarks = ^(NSArray * _Nullable results) {
for (FBFaceDetectionResult *face in results) {
NSLog(@"face %d keypoints %lu", face.faceId, (unsigned long)face.keyPoints.count);
}
};
[self.beautyEffectEngine setCallbacks:callbacks];
FBEngineStats *stats = [self.beautyEffectEngine getStats];
NSLog(@"fps=%.1f avg=%.2fms session=%.1fs",
stats.fps, stats.avgProcessTimeMs, stats.sessionTimeS);
```
## 画像の処理
`FBImageFrame` は I420、NV12、NV21、RGB、RGBA、BGR、BGRA、ファイル、テクスチャ、**`NSImage`** に対応します。
```objc theme={null}
FBImageFrame *fromFile = [FBImageFrame createWithFile:@"/path/photo.png"];
FBImageFrame *fromRGBA = [FBImageFrame createWithRGBA:data width:width height:height stride:stride];
FBImageFrame *fromNSImage = [FBImageFrame createWithNSImage:nsImage];
```
先に `type` を設定し、そのあと `processImage:` を呼び出します(追加のモード引数はありません)。出力フォーマットは入力と一致します。
```objc theme={null}
input.type = FBFrameTypeVideo; // or FBFrameTypeImage
FBImageFrame *output = [self.beautyEffectEngine processImage:input];
```
`FBFrameTypeVideo` はリアルタイムストリーム、`FBFrameTypeImage` は静止画と `NSImage` 向けです。
回転 / ミラー / 変換 / 保存:
```objc theme={null}
[input rotate:FBImageRotation90];
[input setMirror:@"horizontal"]; // applied during processImage:
FBImageFrame *rgba = [output convert:FBImageFormatRGBA];
const uint8_t *bytes = [rgba data];
[output toFile:@"/path/out.jpg" quality:90];
```
YUV プレーン: `dataY`、`dataU`、`dataV`、`dataUV`、および `strideY` / `strideU` / `strideV` / `strideUV`。
## 外部テクスチャ
OpenGL スレッドでエンジンを作成し、`externalContext = YES` を設定してください。入力と出力のテクスチャはそのコンテキストを共有する必要があります。
```objc theme={null}
FBEngineConfig *config = [[FBEngineConfig alloc] init];
config.appId = @"your appId";
config.appKey = @"your appKey";
config.externalContext = YES;
self.engine = [FBBeautyEffectEngine createEngineWithConfig:config];
FBImageFrame *inputFrame = [FBImageFrame createWithTexture:textureId
width:width
height:height
stride:width * 4];
inputFrame.type = FBFrameTypeVideo;
FBImageFrame *outputFrame = [self.engine processImage:inputFrame];
GLuint outputTexture = [outputFrame texture];
```
推奨テクスチャパラメータ: `GL_LINEAR`、`GL_CLAMP_TO_EDGE`。エンジンは入力テクスチャを削除しません。出力テクスチャは SDK が所有します。
TRTC / Agora / LiveKit への接続: [サードパーティ連携](/ja/macos/third-party-integration)。
## ライフサイクル
`NSViewController` の strong 参照でエンジンを保持します。ビューが消えるかウィンドウ最小化時はキャプチャを止めます。セッション終了時はエンジンを `nil` にします。
```objc theme={null}
- (void)dealloc {
self.beautyEffectEngine = nil;
}
```
## 関連ドキュメント
* [サードパーティ連携](/ja/macos/third-party-integration)
* [ベストプラクティス](/ja/macos/best-practices)
* [エラー処理](/ja/macos/error-handling)
* [よくある質問](/ja/macos/faq)
* [API リファレンス](/ja/macos/api-reference)
カメラ(任意): `Info.plist` に `NSCameraUsageDescription` を追加します。
## ヘッダーのインポート
```objc theme={null}
#import
```
AppKit 型(`NSImage`)には `#import ` が必要です(macOS では通常、エンジンヘッダーまたはプレフィックスヘッダーで導入済みです)。
## ログ設定
ログはデフォルトでオフです。エンジン作成の**前**に `setLogConfig:` を呼び出す必要があります。
```objc theme={null}
FBLogConfig *logConfig = [[FBLogConfig alloc] init];
logConfig.level = FBLogLevel_Info;
logConfig.consoleEnabled = YES;
logConfig.fileEnabled = YES;
logConfig.fileName = @"/path/in/container/facebetter.log";
[FBBeautyEffectEngine setLogConfig:logConfig];
```
## エンジンの作成
macOS Bundle ID をバインドし、`licenseToken` または `appId` + `appKey` を渡します。[AppID と AppKey の取得](/ja/intro/enable-service#appid-と-appkey-の取得) と [認証とライセンス](/ja/intro/license) を参照してください。
**優先順位:** `licenseToken` が空でない(ライセンストークン、`{token}` JSON、または `.lic` の内容)場合はローカル検証。それ以外は `appId` + `appKey` で `/facebetter/v2/auth` を呼び出します。
```objc theme={null}
FBEngineConfig *engineConfig = [[FBEngineConfig alloc] init];
engineConfig.appId = @"your appId";
engineConfig.appKey = @"your appKey";
// engineConfig.licenseToken = @"your license token";
engineConfig.externalContext = NO; // YES only when you own the GL context
self.beautyEffectEngine = [FBBeautyEffectEngine createEngineWithConfig:engineConfig];
if (self.beautyEffectEngine == nil) {
NSLog(@"Failed to create beauty engine");
return;
}
```
`createEngineWithConfig:` が返すのは**インスタンス**であり、シングルトンではありません。
## 美肌
強度は通常 `[0.0, 1.0]` です。スタイル列挙: [パラメータ列挙](/ja/intro/makeup)。
```objc theme={null}
[self.beautyEffectEngine setSmoothing:0.5f];
[self.beautyEffectEngine setSmoothingStyle:FBSmoothingStyle_Natural];
[self.beautyEffectEngine setWhitening:0.3f];
[self.beautyEffectEngine setWhiteningStyle:FBWhiteningStyle_ColdWhite];
[self.beautyEffectEngine setSharpening:0.2f];
[self.beautyEffectEngine setRosiness:0.15f];
```
### 肌領域のみ
オンにすると、スムージング / 美白 / 血色は検出された肌にのみ適用されます。
```objc theme={null}
[self.beautyEffectEngine setBeautySkinOnly:YES];
```
## リシェイプ
`setReshape:intensity:` の範囲は **`[-1.0, 1.0]`** です。`0` はオフです。パラメータ: `FBReshape_FaceThin` … `FBReshape_BrowThickness`(`0`–`25`)。意味: [パラメータ列挙](/ja/intro/makeup)。
```objc theme={null}
[self.beautyEffectEngine setReshape:FBReshape_FaceThin intensity:0.4f];
[self.beautyEffectEngine setReshape:FBReshape_EyeSize intensity:0.2f];
```
## ボディリシェイプ
`setBodyReshape:intensity:` の範囲は **`[0.0, 1.0]`** です。`0` はオフです。先に `addResourcePack:` で `resource_body.fbd` を登録してください。パラメータ: `FBBodyReshape_BodySlim` … `FBBodyReshape_TorsoLong`(`0`–`8`)。[パラメータ列挙](/ja/intro/makeup) と [オプションリソースパック](/ja/intro/resource-packs)。
```objc theme={null}
NSString *bodyPack = [[NSBundle mainBundle] pathForResource:@"resource_body" ofType:@"fbd"];
[self.beautyEffectEngine addResourcePack:bodyPack];
[self.beautyEffectEngine setBodyReshape:FBBodyReshape_WaistSlim intensity:0.4f];
[self.beautyEffectEngine setBodyReshape:FBBodyReshape_LegStretch intensity:0.3f];
[self.beautyEffectEngine setBodyReshape:FBBodyReshape_TorsoLong intensity:0.3f];
```
## メイク
強度、形状、色を分けて設定します。完全なプリセット: [パラメータ列挙](/ja/intro/makeup)。
```objc theme={null}
[self.beautyEffectEngine setLipstick:0.5f];
[self.beautyEffectEngine setLipstickColor:FBLipstickColor_Rouge];
[self.beautyEffectEngine setBlush:0.4f];
[self.beautyEffectEngine setBlushStyle:FBBlushStyle_SunKissed];
[self.beautyEffectEngine setBlushColor:FBBlushColor_CoralPink];
[self.beautyEffectEngine setContour:0.35f];
[self.beautyEffectEngine setContourStyle:FBContourStyle_Natural];
[self.beautyEffectEngine setEyeShadow:0.4f];
[self.beautyEffectEngine setEyeShadowStyle:FBEyeShadowStyle_Soft];
[self.beautyEffectEngine setEyeShadowColor:FBEyeShadowColor_Plum];
[self.beautyEffectEngine setEyeLiner:0.4f];
[self.beautyEffectEngine setEyeLinerStyle:FBEyeLinerStyle_Classic];
[self.beautyEffectEngine setEyeLinerColor:FBEyeLinerColor_Coffee];
[self.beautyEffectEngine setEyebrow:0.4f];
[self.beautyEffectEngine setEyebrowStyle:FBEyebrowStyle_Natural];
[self.beautyEffectEngine setEyebrowColor:FBEyebrowColor_DarkBrown];
[self.beautyEffectEngine setEyelash:0.4f];
[self.beautyEffectEngine setEyelashStyle:FBEyelashStyle_Classic];
[self.beautyEffectEngine setEyelashColor:FBEyelashColor_Black];
[self.beautyEffectEngine setPupil:0.4f];
[self.beautyEffectEngine setPupilColor:FBPupilColor_Hazel];
```
## バーチャル背景
デフォルトのマスクはポートレートセグメンテーションです。ぼかし強度 `[0.0, 1.0]`、`0` でぼかしをクリアします。画像パスは空でない png/jpg である必要があります。
```objc theme={null}
[self.beautyEffectEngine setVirtualBackgroundBlur:0.6f];
[self.beautyEffectEngine setVirtualBackground:imagePath];
[self.beautyEffectEngine setVirtualBackgroundWithData:pngOrJpegData];
[self.beautyEffectEngine clearVirtualBackground];
```
### クロマキー
クロマキーはマスクだけを置き換えます。塗りつぶしはぼかしまたは置換画像のままです。
```objc theme={null}
[self.beautyEffectEngine setChromaKey:FBChromaKeyColor_Green];
[self.beautyEffectEngine setChromaKeySimilarity:0.4f];
[self.beautyEffectEngine setChromaKeySmoothness:0.3f];
[self.beautyEffectEngine setChromaKeyDesaturation:0.2f];
[self.beautyEffectEngine clearChromaKey]; // back to portrait segmentation
```
## フィルターとステッカー
`.fbd` ファイルパスまたはメモリバイトを渡します。
```objc theme={null}
NSString *filterPath = [[NSBundle mainBundle] pathForResource:@"chuxin" ofType:@"fbd"];
[self.beautyEffectEngine setFilter:filterPath];
[self.beautyEffectEngine setFilterIntensity:0.8f];
[self.beautyEffectEngine clearFilter];
NSData *filterData = [NSData dataWithContentsOfFile:filterPath];
[self.beautyEffectEngine setFilterWithData:filterData];
NSString *stickerPath = [[NSBundle mainBundle] pathForResource:@"cherry" ofType:@"fbd"];
[self.beautyEffectEngine setSticker:stickerPath];
[self.beautyEffectEngine clearSticker];
[self.beautyEffectEngine setStickerWithData:stickerData];
```
3D ステッカーにはオプションパック `resource_3d.fbd` が必要です(framework には含まれません)。[オプションリソースパック](/ja/intro/resource-packs) を参照してください。
```objc theme={null}
NSString *packPath = [[NSBundle mainBundle] pathForResource:@"resource_3d" ofType:@"fbd"];
[self.beautyEffectEngine addResourcePack:packPath];
NSString *sticker3dPath = [[NSBundle mainBundle] pathForResource:@"oculos" ofType:@"fbd"];
[self.beautyEffectEngine set3DSticker:sticker3dPath];
[self.beautyEffectEngine clear3DSticker];
```
## コールバックと統計
```objc theme={null}
FBEngineCallbacks *callbacks = [[FBEngineCallbacks alloc] init];
__weak typeof(self) weakSelf = self;
callbacks.onEngineEvent = ^(FBEngineEventCode code, NSString * _Nullable message) {
// 0 license OK, 1 license failed, 100 init complete, 101 init failed
NSLog(@"engine event %ld %@", (long)code, message);
};
callbacks.onFaceLandmarks = ^(NSArray * _Nullable results) {
for (FBFaceDetectionResult *face in results) {
NSLog(@"face %d keypoints %lu", face.faceId, (unsigned long)face.keyPoints.count);
}
};
[self.beautyEffectEngine setCallbacks:callbacks];
FBEngineStats *stats = [self.beautyEffectEngine getStats];
NSLog(@"fps=%.1f avg=%.2fms session=%.1fs",
stats.fps, stats.avgProcessTimeMs, stats.sessionTimeS);
```
## 画像の処理
`FBImageFrame` は I420、NV12、NV21、RGB、RGBA、BGR、BGRA、ファイル、テクスチャ、**`NSImage`** に対応します。
```objc theme={null}
FBImageFrame *fromFile = [FBImageFrame createWithFile:@"/path/photo.png"];
FBImageFrame *fromRGBA = [FBImageFrame createWithRGBA:data width:width height:height stride:stride];
FBImageFrame *fromNSImage = [FBImageFrame createWithNSImage:nsImage];
```
先に `type` を設定し、そのあと `processImage:` を呼び出します(追加のモード引数はありません)。出力フォーマットは入力と一致します。
```objc theme={null}
input.type = FBFrameTypeVideo; // or FBFrameTypeImage
FBImageFrame *output = [self.beautyEffectEngine processImage:input];
```
`FBFrameTypeVideo` はリアルタイムストリーム、`FBFrameTypeImage` は静止画と `NSImage` 向けです。
回転 / ミラー / 変換 / 保存:
```objc theme={null}
[input rotate:FBImageRotation90];
[input setMirror:@"horizontal"]; // applied during processImage:
FBImageFrame *rgba = [output convert:FBImageFormatRGBA];
const uint8_t *bytes = [rgba data];
[output toFile:@"/path/out.jpg" quality:90];
```
YUV プレーン: `dataY`、`dataU`、`dataV`、`dataUV`、および `strideY` / `strideU` / `strideV` / `strideUV`。
## 外部テクスチャ
OpenGL スレッドでエンジンを作成し、`externalContext = YES` を設定してください。入力と出力のテクスチャはそのコンテキストを共有する必要があります。
```objc theme={null}
FBEngineConfig *config = [[FBEngineConfig alloc] init];
config.appId = @"your appId";
config.appKey = @"your appKey";
config.externalContext = YES;
self.engine = [FBBeautyEffectEngine createEngineWithConfig:config];
FBImageFrame *inputFrame = [FBImageFrame createWithTexture:textureId
width:width
height:height
stride:width * 4];
inputFrame.type = FBFrameTypeVideo;
FBImageFrame *outputFrame = [self.engine processImage:inputFrame];
GLuint outputTexture = [outputFrame texture];
```
推奨テクスチャパラメータ: `GL_LINEAR`、`GL_CLAMP_TO_EDGE`。エンジンは入力テクスチャを削除しません。出力テクスチャは SDK が所有します。
TRTC / Agora / LiveKit への接続: [サードパーティ連携](/ja/macos/third-party-integration)。
## ライフサイクル
`NSViewController` の strong 参照でエンジンを保持します。ビューが消えるかウィンドウ最小化時はキャプチャを止めます。セッション終了時はエンジンを `nil` にします。
```objc theme={null}
- (void)dealloc {
self.beautyEffectEngine = nil;
}
```
## 関連ドキュメント
* [サードパーティ連携](/ja/macos/third-party-integration)
* [ベストプラクティス](/ja/macos/best-practices)
* [エラー処理](/ja/macos/error-handling)
* [よくある質問](/ja/macos/faq)
* [API リファレンス](/ja/macos/api-reference)